

Your First Week Building With AI
A day-by-day guide for people who’ve never built anything but want to start—plus a real example of what Day 1 can actually look like

You’ve read about vibe coding. You’ve seen what’s possible. You’re curious.
But you haven’t actually built anything yet.
That’s fine. Everyone starts somewhere. This is the guide I wish I had when I started—not theory, not philosophy, just what to do on Day 1 and every day after.
By the end of seven days, you’ll have shipped something real. Something you use. Something that proves to yourself that you can do this.
Let’s go.
Before You Start: The Only Tool You Need
Forget the complicated setups. Forget the YouTube tutorials about “the perfect AI stack.” You need one thing:
An AI assistant you can have a conversation with.
I recommend Claude. Not because it’s the only option—but because it specifically handles the things that matter for building: complex multi-file work, database design with security considerations, payment integrations, real-time architecture, and maintaining context across long sessions. The entire BuildWith marketplace I’ll show you later was built with Claude.
Which tier matters:
Pro: $20/mo - minimum for serious building
Max: $100/mo - recommended for production projects
Max+: $200/mo - heavy AI leverage, multiple projects
If you’re just starting, Pro is fine. If you’re building something real that you plan to deploy, Max is worth it. One subscription handles everything from ideation to deployment.
Free tiers work for your first experiments. But when you’re ready to build something production-grade, the paid tiers are where the capability lives.
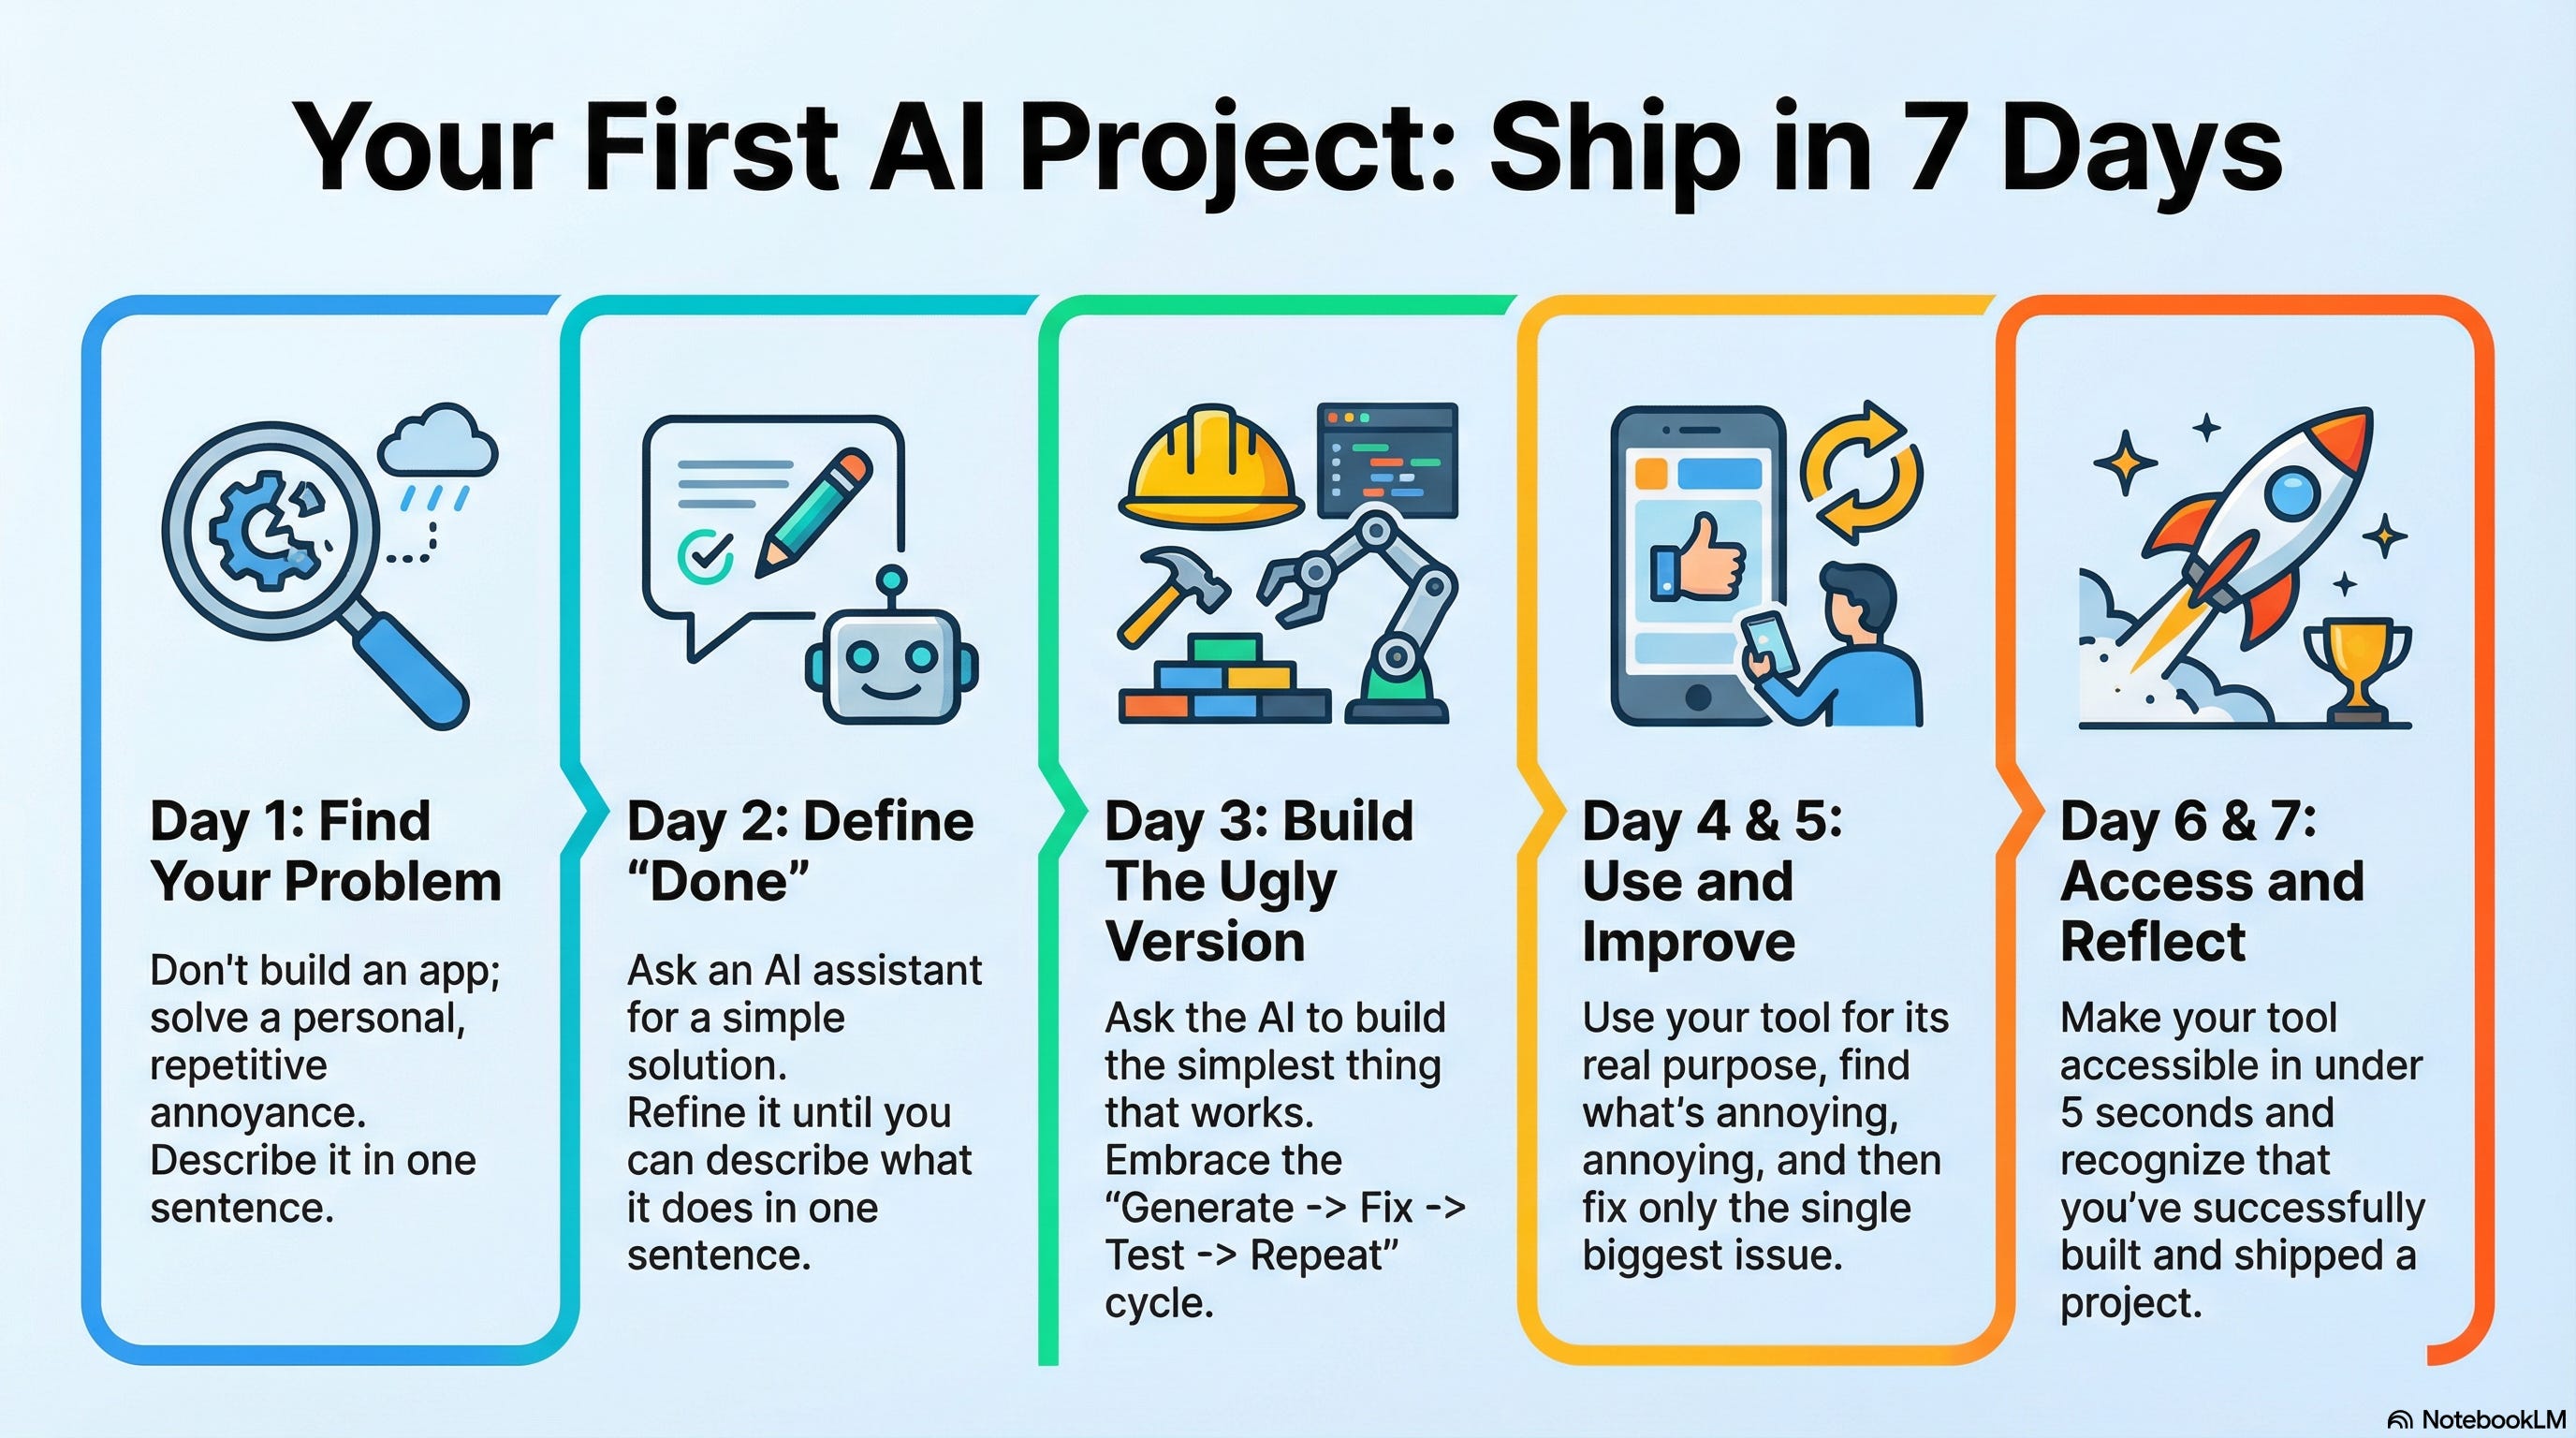
Day 1: Pick Your First Problem
Don’t start with “I want to build an app.”
Start with: “What do I do manually that annoys me?”
Look for something you do at least once a week. Something repetitive. Something that makes you think “there has to be a better way.”
Good first projects:
A checklist you recreate every week
A template you fill out repeatedly
A calculation you do by hand
Information you look up over and over
A reminder system that doesn’t exist yet
Bad first projects:
“An app like Uber but for...”
Anything involving payments - save this for later, unless you have guidance or already know what you are doing when it comes to this
Anything involving user accounts - save this for later, unless you can easily integrate an auth & auth solution - and if you don’t know what that is, you probably can’t
Anything you’d need other people to use immediately
The goal for Day 1: Write one sentence describing your problem.
Not the solution. The problem.
“I waste 20 minutes every Monday creating the same meeting agenda template.”
“I can never remember which client prefers email versus Slack.”
“I manually calculate my freelance project profitability every month and I always mess up the formula.”
That sentence is your foundation. Everything else builds from there.
Spend the rest of the day, or however long you feel you need, putting together what you want in terms of features, workflows, journeys - however you want to think of your problems and what would work to solve them.
Day 2: Describe What “Done” Looks Like
Open Claude (or your AI of choice). Start a new conversation. Paste your problem sentence. Then add:
“I want to solve this. What would a simple solution look like?”
Don’t accept the first answer. Push back. Ask questions. Have a conversation. Use the rest of the material and context you thought through on Day 1 and have the AI challenge your thinking, your approach, your assumptions, and your level of understanding.
The AI will probably suggest something too complicated. That’s fine. Say: “That’s too complex for a first version. What’s the simplest thing that would actually solve my problem?”
Keep going until you can describe “done” in one sentence.
“A single-page checklist that I can reset with one click.”
“A simple lookup tool where I type a client name and it shows their communication preference.”
“A calculator where I input hours, rate, and expenses and it shows my actual profit.”
The goal for Day 2: Write one sentence describing what the finished thing does.
Not how it works. What it really does, and how that ties back to solving your problem.
Day 3: Build the Ugly Version
Today you build. And it will be ugly. That’s the point.
Go back to your AI conversation. Say: “Help me build this. I want the simplest possible version that works.” Start from there, and don’t worry, you haven’t lost all that other context you’ve given it, because with memory capabilities and Claude Projects, you can have the AI review your other chats and any files you attach to your Claude Project. So for now, build the minimum viable solution to your specific problem.
If you’re comfortable with code or the terminal, at least, the AI can write it for you and you can stick with my recommendation of using Claude Code in the terminal. If you’re not, ask for a no-code approach—there are visual builders like Notion, Airtable, or Google Sheets that can handle simple tools.
For something more interactive, try one of these visual AI builders:
Replit — Good for code-based builds with AI assistance, and the one I actually recommend, pay for and use regularly for products, including uPoll, which is continuing to be piloted at UTA, with new updates, bugfixes and feature improvements almost every day (usually via Claude Code, even if we still deploy via Replit before shifting to our production systems).
Lovable (lovable.dev) — Builds React apps from descriptions
Bolt (bolt.new) — Similar, builds full applications
Don’t worry about picking the “right” tool. Pick one and start.
You will hit errors. Things won’t work. This is normal.
Remember: Generate → Lint → Fix → Test → Fix → Repeat.
That’s not failure, that’s the actual workflow. I go deeper on this in the workshop - more on that below!
When errors happen:
Copy the error message
Paste it to your AI
Say: “I got this error. What went wrong?”
The AI will explain and suggest a fix. Try the fix. If it doesn’t work, tell the AI what happened. Keep going.
The goal for Day 3: Have something that works, even if it’s ugly.
“Works” means it does the thing you described on Day 2. Not perfectly. Not beautifully. It just does the thing.
Maybe you've already tried building something. Maybe you hit a wall—Bubble couldn't do what you needed, the AI output was garbage, the whole thing fell apart. That's actually a good sign. You've validated that the problem matters. Now you need a better approach.
Day 4: Use It For Real
Today, no building. Today, you use the thing you made.
This sounds obvious. It’s not. Most people build something and then never actually use it. They move on to the next idea.
Don’t do that.
Use your tool for its intended purpose. If it’s a checklist, run through the checklist. If it’s a calculator, calculate something real. If it’s a lookup tool, look something up.
While you use it, notice what’s annoying. What’s missing. What’s confusing.
The goal for Day 4: A list of 3-5 things that bug you about your own tool.
Write them down. These become tomorrow’s improvements.
Day 5: Fix One Thing
Pick the most annoying item from your list. Just one.
Go back to your AI conversation (or start a new one with context about what you built). Describe the problem: “When I use this, [X] is annoying because [Y]. How do I fix it?”
Fix that one thing. Test it. Make sure it works.
Don’t fix everything. Just one thing.
The goal for Day 5: Your tool is slightly better than yesterday.
This is iteration. This is how real software gets built. Not in one perfect session, but through repeated small improvements, and a short feedback loop: test, track, iterate.

Day 6: Make It Accessible
Your tool works. You’ve used it. You’ve improved it. Now make sure you can actually get to it when you need it.
If it’s a web page, bookmark it.
If it’s a spreadsheet, pin it to your home screen.
If it’s code running locally, figure out how to launch it easily.
The best tool in the world is useless if you forget it exists. Make access effortless.
The goal for Day 6: You can open your tool in under 5 seconds. Optionally (though I always do it), make it so that you can easily deploy/update it. You want to be able to spot an improvement or bug, get a fix in place with the help of AI, and push it out to test/validate that it did in fact get fixed as quickly as possible.
Day 7: Reflect and Decide
You built something. You used it. You improved it.
Now ask yourself two questions:
1. Did this solve the problem I started with?
If yes, great. You have a tool. Keep using it. Keep improving it when things bug you.
If no, that’s valuable too. You learned something about what the problem actually is. That’s progress.
2. Do I want to keep building?
Some people do this once and they’re satisfied. Problem solved, move on.
Some people get hooked. They start seeing problems everywhere that could be solved the same way. They want to build more.
Both are valid. But if you’re in the second camp, you just discovered something important about yourself. As always, I delve deeper into this during the workshop, which I give details on below.
What You’ve Proven
In seven days, you went from “I’ve never built anything” to “I built a thing and I use it.”
That’s not a small thing. Most people never do it.
You proved you can:
Identify a real problem
Describe a solution
Work with AI to build it
Handle the debug cycle (it’s normal, not failure)
Use it and improve it
Make it part of your workflow
The next build will be faster. You’ll know the rhythm. You’ll trust the process.
And the build after that will be faster still.
Key Takeaways
Five things to remember:
AI accelerates, doesn’t replace. You still need to understand the patterns. The judgment is yours.
Security first. Even for simple tools, think about who can access what. For production apps: authentication, input validation, access controls.
Debugging is normal. The Generate → Fix → Test → Repeat cycle isn’t a sign of problems. It’s how this works.
One tool, full stack. Claude handles planning, design, frontend, backend, devops, testing. You don’t need to learn five different tools.
Cost-effective leverage. $100/month for capabilities that would require a team. That’s the new reality.
What’s Next
If you want to keep going, here’s the pattern:
Week 2: Build something slightly more ambitious. Two features instead of one. A little more complexity.
Week 3: Build something you’ll share with one other person. A friend, a colleague. Get feedback from someone who isn’t you.
Week 4: Build something that solves a problem for someone else entirely.
Each week, you expand the scope slightly. You stretch into new territory. You learn what you don’t know.
That’s the whole game. Repeat until you’re building things you never thought possible.
And, if you go through this and find that building, while enabling you, takes too much time by yourself, or you aren’t willing to go through the trouble without guidance, you can always build with me during the workshop—details below!
What This Looks Like With Experience: The BuildWith Story
A couple of days ago, I built BuildWith: a two-sided marketplace connecting AI builders with clients. Production-ready with payments, messaging, security scanning. In a single day.
Here’s the honest truth: This is what 20 years of software engineering plus 3 years of building with AI looks like. Experience compounds. I’m not one or two steps ahead of someone starting out, I’m 10 or 20 steps ahead. And it’s crazy how much leverage AI can give you - I’ve built more apps in the last 12 months than I have in the previous 12 years!
But that’s the point. When you start doing this and build this leverage and learn these patterns, you can get here too. What I did in a single day, you can sustainably do in a week. And it’s only going to get faster and better as AI improves and the intelligence infrastructure - the pipelines, the capabilities - keep advancing.
Here’s what actually happened:
The Numbers
Commits: 28
TypeScript Files: 144
Database Tables: 10
Supabase Migrations: 24
E2E Test Suites: 7
Unit Test Files: 3
Build Time: Single Day
Phase 1: Foundation (Before Any Features)
Before writing any code, I created a dedicated Claude Project using the Claude MacOS desktop client, and I used the first chat thread to describe what I wanted to build, and had it do deep research on competitors, features, roadmaps, as well as to come up with appropriate Claude Project instructions for the project. I update the project instructions with the results after some review and fine-tuning, then started a new chat and started having a conversation with Claude to figure out the plan, design, things I wanted in the MVP, strategy for building, etc. I ended up manually creating the initial code project directory with a CLAUDE.md file, which serve as persistent instructions that guide every conversation in Claude Code, the terminal-based interface I used in this case for the actual development of the marketplace.
NOTE: You don't need to understand this file in its entirety. The point is: I documented the patterns I wanted Claude Code to follow, so every conversation started with shared understanding. Now, here's what that looks like:
# CLAUDE.md

This file provides guidance to Claude Code (claude.ai/code) when working with code in this repository.

## Project Overview

BuildWith is a two-sided marketplace connecting AI/vibe coders (Builders) with clients seeking custom builds, template personalization, and repo customization. Deployed at buildwith.g8n.ai.

## Commands

```bash
npm run dev      # Start development server (localhost:3000)
npm run build    # Production build
npm run lint     # Run ESLint
```

## Tech Stack

- **Framework**: Next.js 16 (App Router), React 19, TypeScript strict mode
- **Database**: Supabase PostgreSQL with Row Level Security
- **Auth**: Clerk (Google, GitHub, LinkedIn, email)
- **Payments**: Stripe Connect Express (milestone-based escrow)
- **Realtime**: Supabase Realtime (messaging, notifications)
- **Styling**: Tailwind CSS v4 + shadcn/ui
- **State**: TanStack React Query for client-side data fetching
- **Forms**: React Hook Form + Zod resolver

## Architecture

### Route Groups
- `(auth)` - Authentication pages (sign-in, sign-up, onboarding)
- `(dashboard)` - Protected dashboard with role-based navigation
  - `/client/*` - Client features (post projects, manage applications, milestones)
  - `/builder/*` - Builder features (browse projects, listings, applications, earnings)
- `(marketing)` - Public marketing pages
- `/builders/[id]` - Public builder profile pages

### Supabase Integration
- **Server**: `createSupabaseServerClient()` from `@/lib/supabase/server` - uses Clerk JWT via `auth().getToken()`
- **Client**: `useSupabase()` hook from `@/lib/supabase/client` - uses Clerk session token
- **Admin**: `createSupabaseAdminClient()` from `@/lib/supabase/admin` - bypasses RLS for system operations
- **Types**: Manual types in `@/types/database.ts`

### Server Actions Pattern
Located in `src/app/actions/`:
- `builder.ts` - Builder profile, listings, applications
- `project.ts` - CRUD for projects, application accept/reject
- `milestone.ts` - Milestone management and payment flow

All server actions follow this pattern:
```typescript
type ActionResult<T = void> =
  | { success: true; data?: T }
  | { success: false; error: string };

export async function actionName(input: Input): Promise<ActionResult> {
  // 1. Auth check via auth() from Clerk
  const { userId } = await auth();
  if (!userId) return { success: false, error: "Unauthorized" };

  // 2. Zod validation
  const validated = schema.safeParse(input);
  if (!validated.success) return { success: false, error: validated.error.errors[0].message };

  // 3. Supabase operation with RLS
  const supabase = await createSupabaseServerClient();
  // ... operation

  // 4. Cache invalidation
  revalidatePath("/path");
  return { success: true, data: result };
}
```

### Validation Schemas
Located in `src/lib/validations/`:
- `builder.ts` - Profile, service listings, applications, filters
- Schemas defined in server action files for project/milestone operations

### User Roles
Three roles stored in `profiles.user_type`: `client`, `builder`, `admin`
- Role hooks in `@/lib/clerk/hooks.ts`: `useUserRole()`, `useIsBuilder()`, `useIsClient()`
- Dashboard sidebar in `@/components/layout/dashboard-sidebar.tsx` auto-switches navigation based on role

## Code Conventions

- TypeScript strict mode, avoid `any` types
- Zod schemas for all input validation
- Server Components by default, `"use client"` only when needed
- Named exports only (no default exports)
- Mobile-first Tailwind classes
- Use React Query for client-side data fetching with `useSupabase()` hook

## Database Tables

| Table          | Purpose                                          |
|----------------|--------------------------------------------------|
| profiles       | User data, linked to Clerk ID                    |
| projects       | Client project postings                          |
| applications   | Builder proposals for projects                   |
| milestones     | Payment stages with escrow status                |
| services       | Builder service listings                         |
| conversations  | Chat threads                                     |
| messages       | Individual messages                              |
| reviews        | Bidirectional ratings                            |
| notifications  | User notifications                               |
| security_scans | Snyk vulnerability scan results for deliverables |

## Security Requirements

- RLS policies on ALL Supabase tables
- Auth check at data layer (server actions), not just middleware
- Validate all inputs with Zod before database operations
- Verify Stripe webhook signatures
- User can only access their own data (enforced by RLS using `auth.jwt()->>'sub'`)

## Supabase Migrations

Migrations stored in `supabase/migrations/`. Apply via:
```bash
# Using Supabase MCP (preferred)
mcp__supabase__apply_migration

# Using CLI
npx supabase db push
```
This isn’t just documentation—it’s instructions that shape how Claude Code understands and extends the codebase. Every conversation started by reading it.
And this shape of the CLAUDE.md file? It’ll change by tomorrow, when I spend another day on it, making updates from feedback and piloting users, online research around the features and capabilities available in similar or competing marketplaces, safety and compliance checks, performance updates, or data gathered from folks helping me to test and iterate and improve this builder/client marketplace so that we can put together a template, if not a complete solution.
The template could serve as the basis for future workshops where we focus on clients getting to personalize and build their own marketplace rapidly using a pre-existing structure and minimum set of features.
Phase 2: Core Features
Once the foundation was solid:
Project posting and browsing
Builder applications with proposals
Milestone system with escrow tracking
Real-time messaging
Notification system
Phase 3: Design System
One significant commit overhauled the entire UI:
Dark-first luxury aesthetic
760+ lines of CSS custom properties
Theme switching (dark/light/system)
Glassmorphism, mesh gradients, glow effects
Phase 4: Payments
Stripe Connect Express for builder payouts
Webhook handlers for all async events
Escrow pattern (happy path complete, rejection path under design):
Client funds →
Status “funded” →
Builder delivers →
Client approves →
Transfer to builder (85%) + Platform fee (15%)
Client rejects (TBD, still reviewing what works best here) →
Feedback gathered and submitted back to Builder for Revision
Revisions negotiated between builder and client prior to escrow process
Client can opt for project/contract dismissal
25% cancellation fee charged to client from current milestone price for 15% platform fee and 10% builder compensation regardless of dismissal.
Any milestones previously hit by builder will already have been awarded/paid out and had the platform fee collected, thus will not be refunded to client.
Delivered content for current milestone locked out to client after gathering feedback.
All deliveries to client from prior milestones will remain available to them, as that portion of the transaction is already paid out and considered complete.
Phase 5: Security & DevOps
Snyk integration for dependency scanning
Security scanning on builder deliverables
CI/CD pipeline with GitHub Actions
Rate limiting middleware
Phase 6: QA & Fixes
Multiple commits fixing TypeScript errors, ESLint warnings, test selectors, formatting. This phase is important to understand:
The real workflow is: Generate → Lint → Fix → Test → Fix → Repeat.
AI doesn’t produce perfect code on the first pass. The git history shows fixes for strict null checks, type mismatches, unused imports, build-time vs runtime errors. This is normal. This is expected. The debugging cycle is part of the process, not a sign something went wrong.
The Cost
Claude Max: $100 per month
Vercel: Hobby Free
Supabase: Free tier - $0
Clerk Free: 10K MAUs - $0
Sentry (if you want to go that route instead of keeping it simpler up front): Free - 5K errors - $0
Total: $100/mo
$100/month for capabilities that would take a team. That’s the leverage.
Why This Matters For You
The 7-day framework I supplied you with above is the sustainable version of what I compressed into one day for folks who don’t do this regularly. The speed came from experience with these patterns—patterns you’ll learn by doing.
What’s possible: BuildWith in a single day.
What’s sustainable for newcomers: The same quality in a week.
The gap closes faster than you think. And every month, AI gets better. The intelligence infrastructure improves. What takes a week today might take two days next year.
Workshop: Build With Me
I’m running a live workshop on Sunday, January 25th.
Three hours. Three spots. Everyone walks out with a working frontend prototype.
The goal isn’t to watch me talk. The goal is to build. I’ll walk through my exact process—the same approach behind uPoll, UltraPost, BuildWith, and everything else. Then we build together. You work on your project, I provide guidance and troubleshooting in real-time.
Investment: Normally $997. First run: $249.
Why the discount? I want three people who are serious about building, and I want to refine the format and the framework I’m putting together. You get a deal. I get proof. We both win.
I’m qualifying by project scope. Three hours is enough to get a working prototype if the scope is right. If your idea is too big, we won’t hit that goal, and I’d rather say no upfront than have you walk away frustrated.
Interested? Reply to this email or DM me with your project idea. I’ll tell you if it fits.
Next up: “Why Owning Your Tools Matters More Than Saving Money”—the real reason I build my own software. Subscribe so you don’t miss it.
Notes / Links
The Vibe Coding Playbook: How I Actually Build -
The Vibe Coding Playbook: How I Actually Build
·
I've shipped more in the last 12 months than in the previous 12 years.
What Vibe Coding Actually Is -
Software Sovereignty post: What If You Owned Your Tools Instead of Renting Them? -


Visual builders mentioned:
Replit
Lovable
Bolt
AI recommendation:
Claude Subscription
Pro $20/mo - minimum. Good enough for most people who are solving small pain points and first beginning to leverage AI to build things.
Max $100/mo - recommended. For folks serious about continuing beyond the prototypes and single-person artifacts they are putting together and getting comfortable building.
Max $200/mo - serious for heavy AI use. This option is for if you’re going to be full time on a project or building out your brand/business and willing to learn about and leverage multiple agents running in parallel or across multiple projects for you.
Projects mentioned:
BuildWith — buildwith.g8n.ai
uPoll — upoll.live
UltraPost — ultrapost.g8n.ai
You went deep on this one Ahad. Anyone just getting started needs to read this, it’s both authoritative and accessible. BuildWith looks great too—keen to give it a spin!